Dataset Submission List Elements
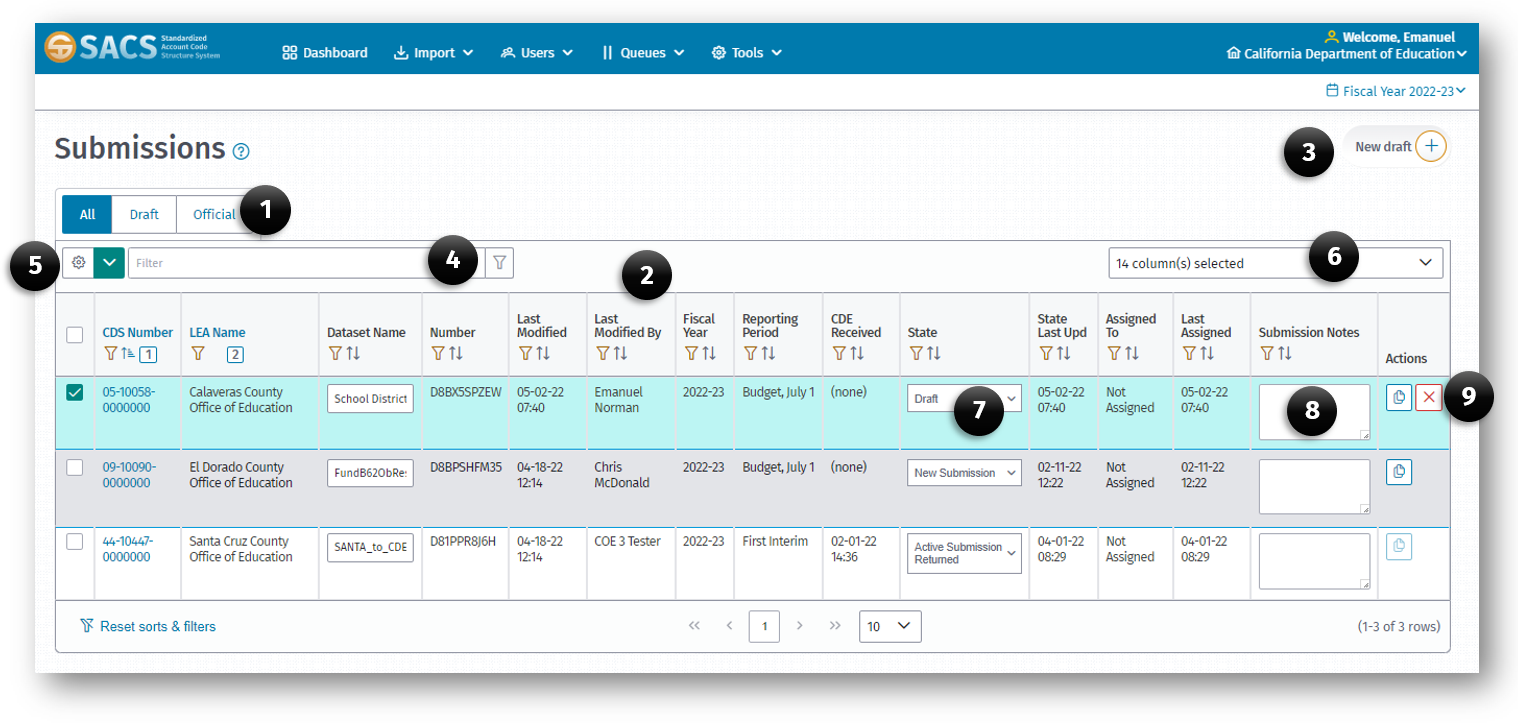
The Dashboard Datasubmission List displays the following:
- Draft/Offical Submission buttons
- Data Submissions List
- New Draft button
- Global Filter
- Compare Submissions and Query SACS option
- Column selector
- Dataset Workflow State column
- Submission Notes
- Copy/Delete Submission Action buttons
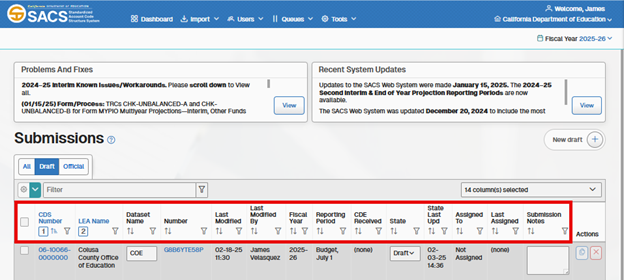
By default, the Dataset Submission list displays DRAFT datasets for the current user on the Dataset Submissions List. If there are no draft datasets associated with the current user, an error message will be displayed at the top of the window indicating that no datasets where found.
Display Drafts or Official Submissions option
Viewing submissions not in draft status requires selecting the Display Drafts Only button which when unselected will display all datasets in any status that is associated with the current user.
New Draft button
Another feature of the Dataset Submission List includes the ability of the user to create a new empty dataset using the New Draft button located on the right side of the screen.
Filter and Sorting Columns
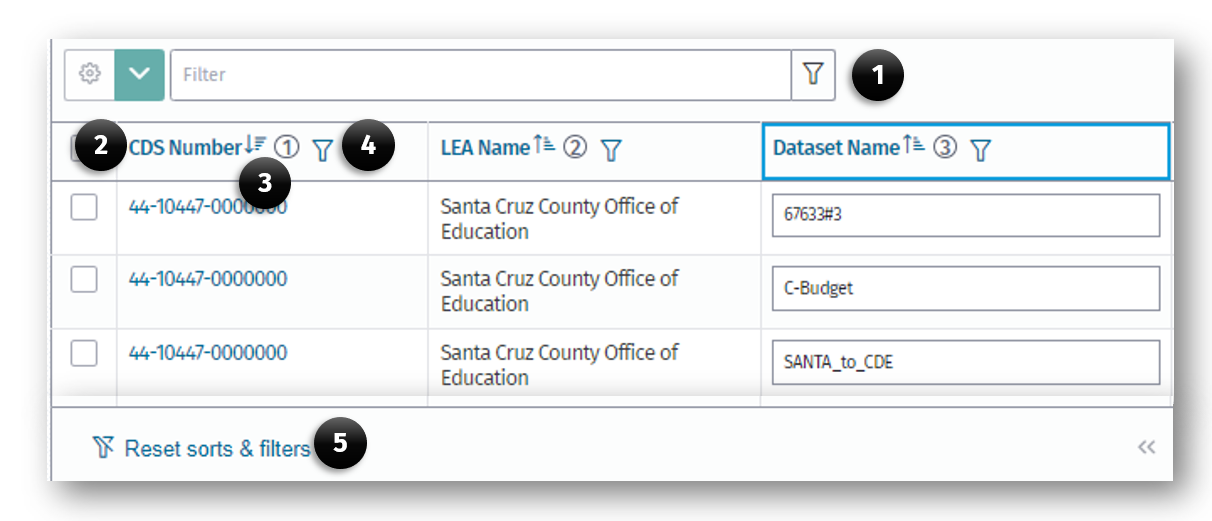
Each column has a column name has the following components to filter and/or sort records:
- Global Filter
- Column Name (Clicking this link sorts the list ascending or descending)
- Sort Order indicator (By using the CTRL + select, you can sort multiple columns)
- Filter icon
- Filter and Sort Reset link
Column Sort and Filter Icons
Each column in the Dataset Submission List has a series of icons that perform sort and filter operations of that column.
Sorting a column
The Sort icon is also a Sort indicator which displays the current sort
a. Click the Sort (3) icon to sort the column in ascending order (3).
b. Click the Sort (4) icon a second time to sort the column in descending order (4).
c. When no sort is applied to the column, a neutral sort indicator (5) is displayed.
Filtering a column
The Filter icon displays a Filter dialog box which allows the user to either select records from the list or to type in a specific criterion to be used in the search parameter.
-
Click the Filter icon (6) to open a filter dialog box.
- Type the search criteria in the Search box.
- As the pattern is typed, the filter dynamically eliminates the items not meeting the criteria.
- When the user completes the word pattern, the list is filtered to meet the criteria or:
-
Select the record(s) in the list to be displayed.
Dataset List Columns
The Dataset Submissions list has up to 15 columns. Increase the width of displayed columns by reducing the number of columns. Each column has a sort and filter icon and a column name that may be used to sort the column in ascending or descend order. See the Sorting a Column and Filtering a Column section of this guide for more information on how to use those features.
Add or Remove Columns
-
From the Dataset Submission List, click the Column Selector drop-down list box.
-
Select or unselect each column to remove or add.
Note: The resulting list will update as checkboxes are selected or unselected.
Number of Rows
The number of rows function allows the user to determine the number of rows or datasets that is visible on a page.
Note: By default, 10 rows are displayed.
Resizing Columns
Column sizes may be manually resized using the sizing handles. To resize a column:
-
Position your mouse pointer over the column border until you see the sizing pointer.
-
While holding the left mouse button down, drag the mouse left or right until the desired size is achieved.
Column Descriptions
CDS Number
- The CDS Number column displays the entire CDS code for each dataset. Click the CDS code to access the dataset.
LEA Name
- The LEA Name column displays the name of the entity.
Dataset Name
- The Dataset Name column/field displays the unique name of the dataset that the user assigned.
Number
- The Number column displays identification numbers that are unique and associated with each individual dataset. Once a dataset has been created or imported into the SACS Web System, the number is generated. Click on the number to access the dataset.
Dataset Type
- The Dataset Type column/field displays “SACS” or “Charter Alternative” depending on the reporting format used to prepare the submission. The Charter Alternative reporting format is available only to charter schools that report separately from their authorizing LEA.
Last Modified
- The Last Modified column/field displays the date a modification to the dataset was made.
Last Modified By
- The Last Modified By column/field displays name of the user who last modified the dataset.
Fiscal Year
- The Fiscal Year column/field displays the fiscal year the dataset represents.
Reporting Period
- The Reporting Period column/field displays the period the dataset represents (Budget, Interim 1, 2 or 3, Unaudited Actuals).
CDE Received
- The CDE Received column/field displays the date the UA dataset was sent to CDE for review.
State
The State column/field serves two purposes:
-
It displays or indicates the current state of the dataset. Original state is Draft.
-
It acts as an action button. The user may use the drop-down list box to promote or demote the dataset. Except for promoting a dataset from the Draft to Pending Internal Review state, state changes must be made via the appropriate queue.
State Last Updated
- The State Last Updated column displays the date the dataset state was last changed.
Assigned To
- The Assigned To column displays the name of the user assigned to the dataset. The Assigned To field may be updated when the dataset is accessed through a queue.
Last Assigned
- The Last Assigned column displays the date the Assigned To field was modified.
Submission Notes
- The Submission Notes column displays the note entered in the note field for the current dataset. Notes may be entered from the Dataset Submission List or through a queue.
To add a note to the submission:
- Click in the text box field and enter the text in freeform (maximum of 255 characters).
- Click out of the field to save the note. A message will appear at the top of the screen confirming the note has been successfully saved.
Note: This field is expandable by dragging the sizing handle on the lower right corner of the textbox.
Copy and Share a Submission
The Copy Submission button, in the Actions column, is available for each dataset. It may be used to create a copy of the selected dataset and share it with an authorized user if desired.
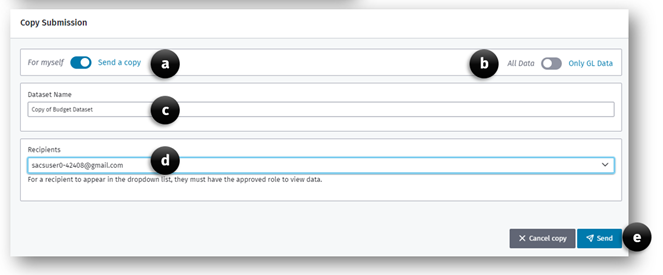
To copy or share a submission:
-
Click the Copy Submission button
-
In the Copy Submission dialog box
a. Select the intended recipient of the dataset by selecting For Myself or Send a copy option.
Note: If Send a copy is selected, the Recipients dropdown list will be active and list all approved recipients.
b. Select the Only GL Data option if you only require the GL data to be copied.
Note: All notes and supplemental data will not be copied.
Note: The All Data or Only GL Data option is available only when the For myself option is selected.
c. Enter a unique dataset name in the Dataset Name textbox.
d. If Send a copy was selected, choose email from the Recipient dropdown list.
e. Click the Copy Submission button to complete the copy or Send button if the submission will be shared with others.
Note: The copied submission will be located on the Drafts submission list.
Deleting a Submission
The Delete Submission button, in the Actions column, is available for each draft dataset. It may be used to delete a selected dataset.
Note that datasetsets may be deleted only when they are in the Draft state.
To Delete a Dataset
-
Click the Delete Submission button
-
Click Yes or No to confirm you want to delete the submission.
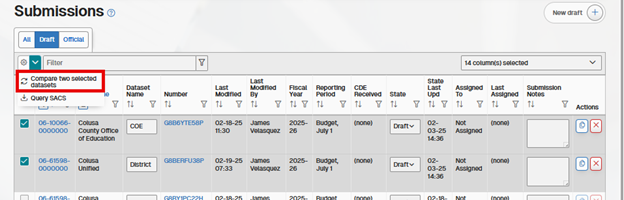
Comparing Two Dataset Submissions
The Compare Two Dataset Submissions feature allows users to view and compare two datasets that are visible in the Submissions menu. Users can compare datasets originating from both different and same Fiscal Years, LEA type, Reporting Period, from the Draft, Submission, and Published Dataset Lists.
To compare two datasets:
-
From the Dataset Submission List, select two datasets by clicking the dataset selector checkbox located on the first column left of the CDS number for the submission. Users can filter the columns on the Submission list to obtain datasets that are on separate pages, reporting periods, fiscal years, etc. to select the dataset they would like to compare.
-
Once the two datasets are checked, select the Compare two selected datasets button located above the check mark column in the cog dropdown menu.
-
On the Compare Dataset dialog box, select the Comparison Type:
- GL Datasets
- Supplemental Datasets
- TRC Explanation Datasets
- TRC Log Datasets
- ALT Form Datasets
- CASH Form Datasets
- Fund Form Datasets
- MYP Fund Datasets
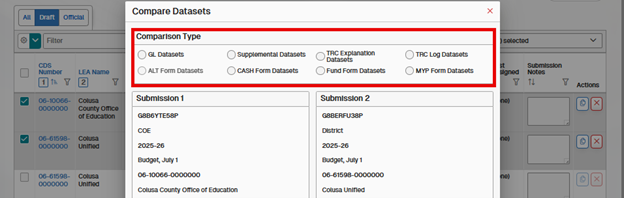
-
If applicable, select the data type for submissions 1 and 2.

-
After the Comparison Type and data type are selected, click the Compare button to see the results.

-
When the appropriate Compare page opens, depending on the comparison type, it will display different results along with a different format:
a. GL Datasets: Displays all GL line data for the selected data type for both submissions. Matched GL lines are alongside each other, while mismatched will not be next to each other. Note: This only applies for the GL line itself, not the value data. The value data does not affect whether the lines are matching or not.
b. Supplemental Datasets: Displays all Supplemental line data for the selected data type for both submissions. Matched GL lines are alongside each other, while mismatched will not be next to each other. Note: This only applies for the Supplemental line itself, not the value data. The value data does not affect whether the lines are matching or not.
c. TRC Explanation Datasets: This displays all unexplained and explained warning TRCs.
d. TRC Log Datasets: Displays all warning and fail TRCs, regardless of severity or status, i.e. whether the TRC has passed or failed.
e. ALT Form Datasets: Only applies to Unaudited Actuals reporting period Alternative Form submissions. Displays all Alternative Form data.
f. CASH Form Datasets: This displays all supplemental data related to form CASH. This selection can only be used when there is CASH supplemental data in at least one dataset.
g. Fund Form Datasets: The report only has Fund 01 and 01I supplemental data. No other fund form or supplemental data will be displayed here. Fund 01 needs to be saved in the submission prior to running the report.
h. MYP Form Datasets: This displays all supplemental data related to form MYP/MYPI. This selection only is able to be used when there is MYP/MYPI supplemental data in at least one dataset.
Dataset Edit and Locking
When a user is a member of an entity and has the role of Edit Dataset or Edit Draft Dataset, the SACS Web system allows modification of a dataset submission. Additionally, the user must lock the form or entire submission prior to editing. When the submission is locked by another user, only a user with the Administration or User Manager role can remove the lock.
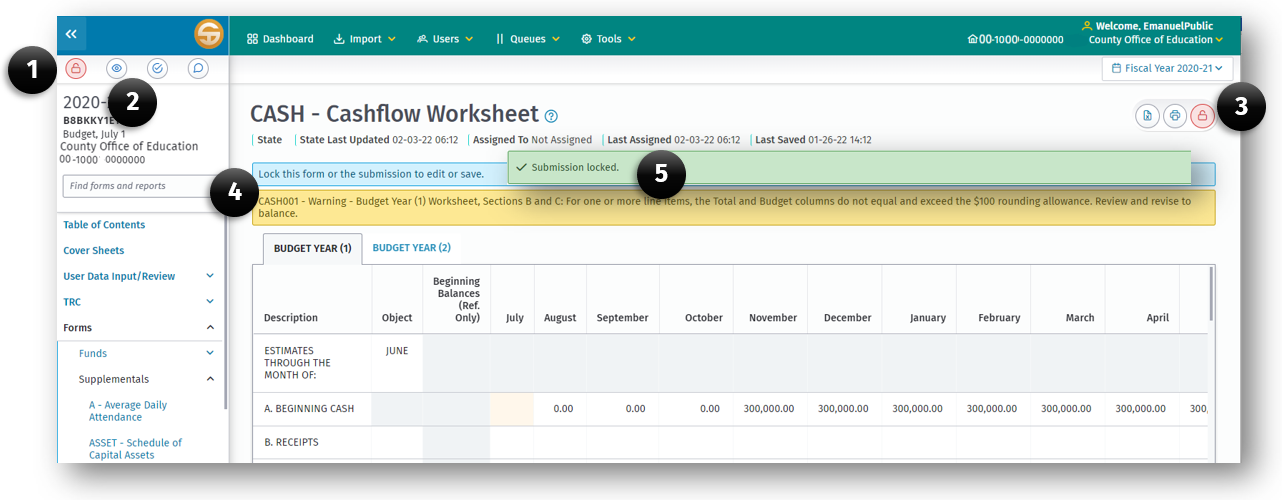
Elements of the Submission Lock feature
- Lock Submission button.
- View Current Locks button.
- Lock Current Form button.
- Notification of who and what form a lock is applied.
- Notification of submission locked.
To lock a submission or individual form
- Open the submission by clicking the submission link on the Dashboard Submission list.
- On the User Data Input Review screen click the Lock Submission button (1) or the Lock Current Form button (3).
- A notification (5) will be displayed if the lock was successful.
To unlock a submission or form
- Go to the User Data Input Review screen or the form that is locked and press the appropriate lock button (1) or (3) to unlock the submission form.
- Click the View Current Locks button (2).
- In the notification (4) click the remove lock button for each form or submission.
Note: A user can unlock their own submission locks only. But a user with the User Management and/or Administration role can unlock another user’s locked submission.
Locking criteria based on form dependencies
| Left Navigation Pane | Locking Requirements |
|---|---|
| Table of Contents | No Locking Requirements |
| User Data Input/Review | Submission wide locking required |
| TRC | Submission wide locking required |
| Forms | Form or Submission wide locking required |
| CEFB | Submission wide locking required |
| IFC Statuses | No Locking Requirements |
| Reports | Form* or Submission wide locking required |
| Version History | No Locking Requirements |
| Import | Submission wide locking required |
| Export | No Locking Requirements |
| LEA Custon Information | No Locking Requirements |
| >NOTE: Locking a form will also prevent other forms from being locked if part of a depencency chain. |