Version History
Version History page
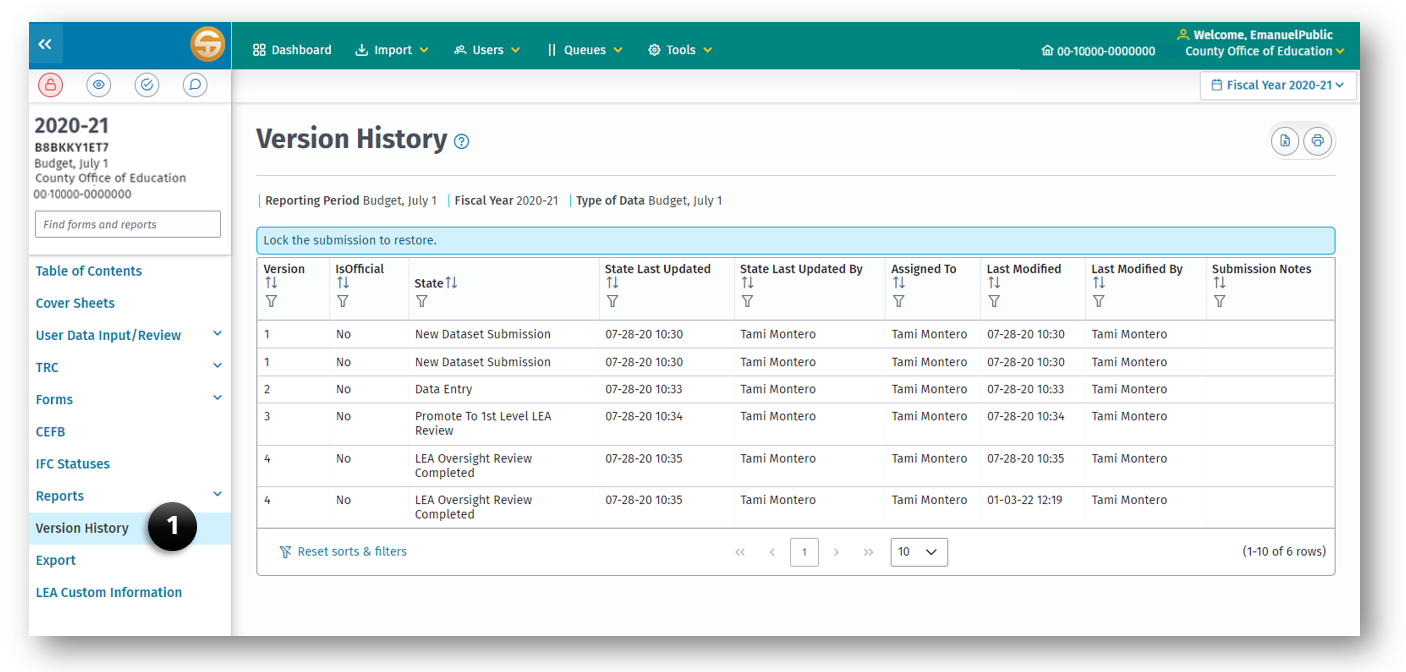
The Submission Version History and Restore feature provides LEA users the ability to view submission version history and the ability to restore prior versions. Functionality for this feature includes:
- The original dataset version is retained.
- The dataset (prior to applying the 1st edit), is copied and a new version number is created.
- All edits are then applied to the new version.
- The most current version is the active version visible to authorized users in the system.
View Version History
Users are able to view submissions applicable to the roles and permissions to include:
- An LEA user with the role of Edit Dataset, Dataset Approval or Administration may view history for a submission dataset when the Status is 3, 4, 5, 15, 34, 57, 60, 61, 75. LEA user with the roll of Oversight or Administration may view history for a submission dataset when the status 9, 10, 11, 12, 13, 15, 34, 57, 60, 61, 65, 75
Restore Prior Versions
The system provides an authorized user a method to restore prior versions on the Submission Version History screen.
Overwrite Datasets
The Overwrite Dataset feature allows a user to replace all or part of existing data within a specific dataset.
When a user is working within a dataset and chooses Import all or part of the data from another file, the Delete All Data option deletes all data associated with the [CDS Number] for the selected dataset including GL, Supplemental and Explanation data, Fiscal Year, Reporting Period, and Type of Data.
When a user imports data using the Delete Only option, selected forms (funds, supplementals, etc.) are imported.
Note: Options are based on selected on Import Type: Other or Official. Selecting Official allows only the Delete All data overwrite option. Selecting Other provide the user with the option to overwrite only the forms being imported or Delete All data.
To overwrite part or all data in a dataset
- Open a submission to view the User Data / Input Review screen and click the Import menu item on the left navigation bar.
- Lock the submission by clicking the Lock Submission button
- Select Official or Other to identify the Type of Import to be used.
- Select the Type of Import/Overwrite by selecting either:
- Delete only those forms (funds, supplementals, etc.) being imported.
- Delete ALL data (including GL, supplemental and Explanation Data).
- Click the + Select File button to select the dataset to be used.
- Click the Upload button to complete the import process.
Stop Import
A user may stop the import process at any time by clicking the Cancel button.
Note: The data import will not be committed until entire process completes.
Print –Import Results
To get a hard copy of the import results:
- Click the Print button located directly above import section of the page. This button functions differently from the Print button next to the Export to Excel button.